
TRAVERSE Global v11.1
Service Order Entry
The Service Order Entry function handles activity performed on your company's internal equipment, such as new service calls, schedules dispatches, and tracks labor and parts used to complete the service order.
Select Service Order Entry from the Service Orders menu, then use the fields at the top of the screen to enter or edit basic information. Use the Site Information and Dispatch tabs to record site, dispatch, equipment, and other information for the service order.
Click a command button to:
| Select | To |
| Copy | Allows you to copy service order information from another service order. |
| Allows you to print the service order. |
Click the New button to open a blank service order record. The system will generate a new service order number.
If you want to edit a service order, select one from the Order No. drop-down list.
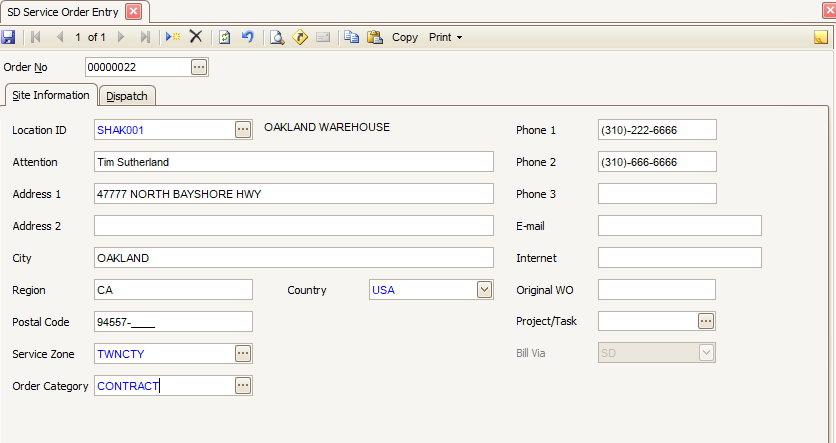
- Select a Location ID from the drop-down list.
- These fields display information for the customer you selected in the Location ID field.
- Attention: the name of the contact listed in the customer information
- Address 1 and Address 2: the address for the selected customer
- City, Region, and Postal Code: the city, region, and postal code for the selected customer
- Phone, e-mail, and Internet: the phone number(s), e-mail address, and Internet website for the selected customer
- The Country field displays the country listed in the address of the customer you selected in the Location ID field. You may also select a country code from the drop-down list.
- Accept or select the Service Zone that covers the area where the site is located. The Service Zone for a new service order will default in according to the address of the site information currently displayed. For example, if using postal codes to determine service zone, the postal code on the Customer/Site ID selected will determine the default Service Zone for this new service order.
- Select an Order Category for the order.
- Enter the original work order number in the Original WO field, if applicable.
- You can tie the service order to a current project by selecting the project from the Project Task drop-down list.
- In the Bill Via field, select whether you want to bill the work order through Service Director or Project Costing. This is only applicable if you have selected a Project Task. See SD link to PC for more information regarding billing via SD or PC.
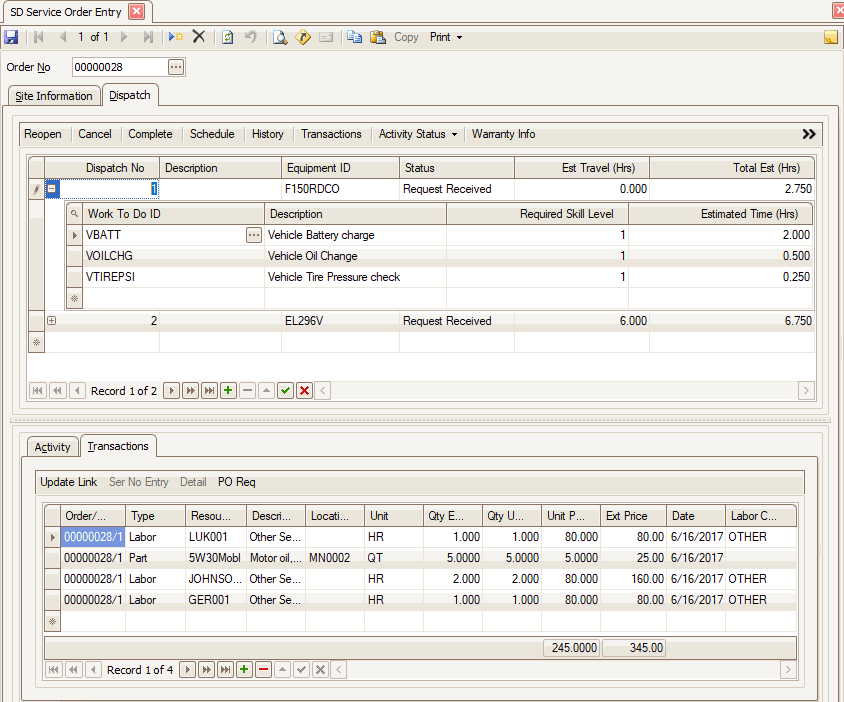
- Click the Append button (
 ) in the Dispatch section, to open a new dispatch record. The dispatch number is generated by the system.
 - Enter a description for the dispatch in the Description field.
- Select the equipment ID to which this service order applies from the drop-down list in the Equipment ID field. If you have the SD Notify Warranty/Contract business rule set to "Yes", a notification window will appear if the site equipment has a warranty or contract associated with it. See the Warranty and Contracts screen for more information.
- The Status field will default to Open when a new dispatch is created. Select a different status from the drop-down list if applicable.
- Enter the estimated travel time in hours in the Est Travel (Hrs) field.
- The total estimated time for the dispatch in hours displayed in the Total Est (Hrs) field is the sum of the estimated travel time and the work to do IDs for the dispatch.
- Press the Enter key or the Tab key to add Work To Do detail. If the work to do detail rows do not appear, a plus sign (
 ) will appear next to the dispatch number. Click the plus sign to add work to do IDs to the dispatch.
 - Select a work to do ID from the drop-down list in the Work To Do ID field. The Description and Required Skill Level fields should display the information from the work to do record.
- Enter the estimated time to perform the work to do in hours in the Estimated Time (Hrs) field.
- Repeat Steps 9-11 for each work to do ID you want to add to the dispatch.
- To finish changes to the dispatch, click the End Edit button (
 ).
). - Click the Save button on the toolbar to save your work.
Use the Toggle button ( ) to switch from Summary (grid) View to Detail (field) View. Use the Detail View to see additional information about the Dispatch.
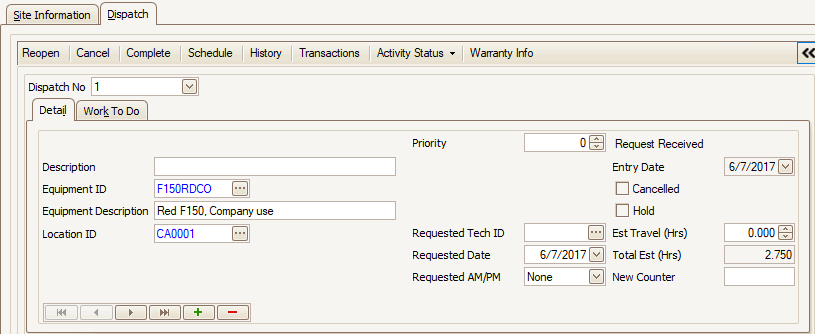
- Click the Append button () in the Dispatch section, to open a new dispatch record. The dispatch number is generated by the system.
- Enter a description for the dispatch in the Description field.
- Select the equipment ID this service order applies to from the drop-down list in the Equipment ID field.
- Select a Location ID for the site equipment.
- Enter a Priority, if applicable.
- Read-only fields Status, Entry Date, Canceled, and Hold will display the current values for each field.
- Enter a Requested Technician ID, Requested Date, and Requested AM/PM as applicable.
- Enter the estimated travel time in hours in the Est Travel (Hrs) field.
- The total estimated time for the dispatch in hours displayed in the Total Est (Hrs) field is the sum of the estimated travel time and the work to do IDs for the dispatch.
- Enter the internal meter number in the New Counter field, if applicable. Examples of counters include the number of hours run, copies made, or pages printed. You can use these information-only numbers as diagnostic tools.
- Accept or select a Dispatch Number to which you want to assign work to do from the drop-down list, as necessary.
- Click the Append button () to add a new Work To Do record.
- Select a work to do ID from the drop-down list in the Work To Do ID field. The Description and Required Skill Level fields should display the information from the work to do record.
- Accept or edit the Estimated Time (Hrs) for the work.
- Repeat Steps 12-14 for each work to do ID you want to add to the dispatch.
- To finish changes to the dispatch, click the End Edit button ().
- Click the Save button on the toolbar to save your work.
Detail tab
Work To Do tab

Click the Save button on the toolbar to save your work.
Schedule a dispatch
- Click the Schedule command button to open the calendar. A Schedule Info window should appear.
- Select the Tech ID, Start Time, and End Time from the associated field drop-down lists.
- Click OK to set the time for the selected technician on the calendar. The calendar will open and display the scheduled dispatch. Close the calendar to return to the Service Order Entry function.
Record arrive/start time on a dispatch
- Click on a new line in the Activity section to start a new record.
- Select Arrive/Start from the drop-down list in the Type field. The workstation's current date and time will display in the Date/Time field. Change the date or time if necessary, and select the technician from the Technician ID drop-down list
- Select the Tech ID, Start Time, and End Time from the associated field drop-down lists.
- Click the End Edit button () to complete the entry.
Complete a dispatch
- Click the Complete command button to open the Complete window.
- Select the completion date and time from the Date/Time field drop-down list. This will default to the current date and time.
- Select the Technician ID from the drop-down list. This field will default to the technician listed for the Arrive/Start activity.
- Click the OK button to complete the entry. The dispatch status now shows Completed, and a Complete entry will appear in the Activity section of the Dispatch tab.
Add parts, labor, freight, or miscellaneous costs to a dispatch
You can add transactions directly to the dispatch via the Transactions tab at the bottom of the screen, or you can open the Transactions function by using the Transactions button on the Dispatch tab. The process you use to add transactions is the same. See the Service Order/Work Order Transaction Entry Overview for more information.
- Click the Transactions command button to open the Service Order Transactions function. To display all of the available fields, click the Toggle button (). Alternately, you can click the Transactions tab at the bottom of the screen.
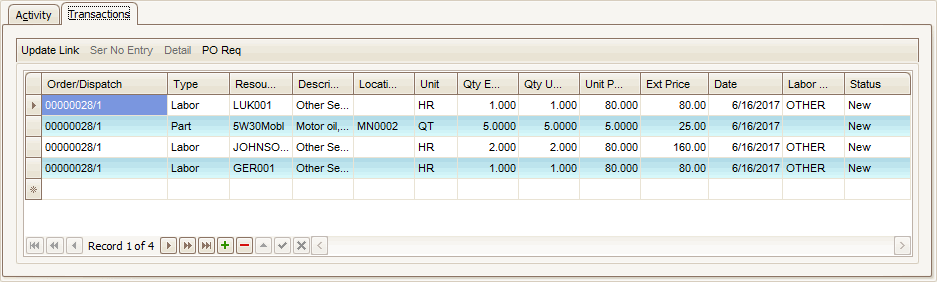
- Click the New button on the tool bar to add a record. The work order number/dispatch line will display in the DispatchID field of the new line.
- Select the type of transaction you are adding from the Type field drop-down list.
- If applicable, select a Resource ID from the drop-down list. If you selected Labor in the Type field, the drop-down list will show your technicians. If you selected Part in the Type field, the drop-down list will show field will show your parts.
- Enter a description into the Description field. If the resource is a part, the item description will display in this field.
- If you selected a part in the Resource ID field, select a location from the Location ID field drop-down list. Otherwise, the Location ID field will be blank.
- The Unit field will display the units of measure for the part selected in the Resource ID field, or the value HR if Labor is selected in the Type field.
- Enter the estimated quantity of the part or labor into the Qty Estimated field.
- Enter the quantity used into the Qty Used field.
- If you selected Labor or Part in the Type field, the unit price displays in the Unit Price field. You may change the unit price.
- If you selected Labor or Part in the Type field, the extended price is calculated using the Qty Used and the Unit Price amounts. If you selected Freight or Misc in the Type field, enter a cost in the Ext Cost field.
- Select or enter a transaction date in the TransDate field. By default, this field will display the current date.
- If you selected Labor in the Type field, select a labor code from the drop-down list in the Labor Code field.
- Click the Save button on the toolbar to save your work.
Cancel or delete a dispatch
Note: You cannot delete a dispatch if the dispatch's status is Posted, Billed, or Completed, or if the dispatch has transactions.
- Select the dispatch you would like to cancel or delete.
- Click the Cancel command button to cancel the dispatch.
- A confirmation window will appear. Confirm the cancellation. A Cancel activity will be added to the Activity section of the Dispatch tab.
Reopen a dispatch
Note: You can reopen a dispatch if the selected dispatch status is Open, and the selected dispatch is canceled.
- Select the dispatch you would like to reopen.
- Click the Reopen command button to reopen the dispatch.
- A confirmation window will appear. Confirm the reopen action. A Reopen activity will be added to the Activity section of the Dispatch tab.

- Click the Append button () in the Activity section, to add a new activity entry to the dispatch record.
- Select a type of activity from the drop-down list in the Type field.
- The Date/Time field will default to the current date and time when a new activity is created. Enter or select a different date from the calendar control if applicable.
- If a technician will perform the activity, select a technician from the drop-down list in the Technician ID field.
- The Entered By field will display the name of the user who added the activity to the dispatch.
- Enter any notes for the activity in the Notes field.
- To finish changes to the dispatch, click the End Edit button ().
- Click the Save button on the toolbar to save your work.